
This article covers how to customize the ShoppingGives widgets available through the new sections feature on all Shopify Online Store 2.0 Themes.
With the introduction of sections, ShoppingGives is now excited to bring to you real-time updates and customizations on all your ShoppingGives widgets!
You'll be able to add the Round-up widget and Store Donations on Purchase widget with simple drag-and-drop functionality, preview it on your page, and customize areas of our widget all on your own.
How to Get Started
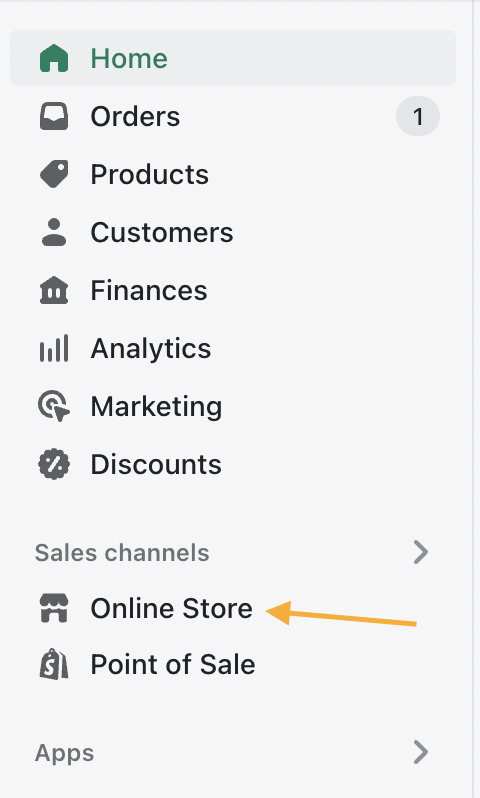
- After logging on to Shopify, navigate to Sales Channels in the bottom left panel and select Online Store:
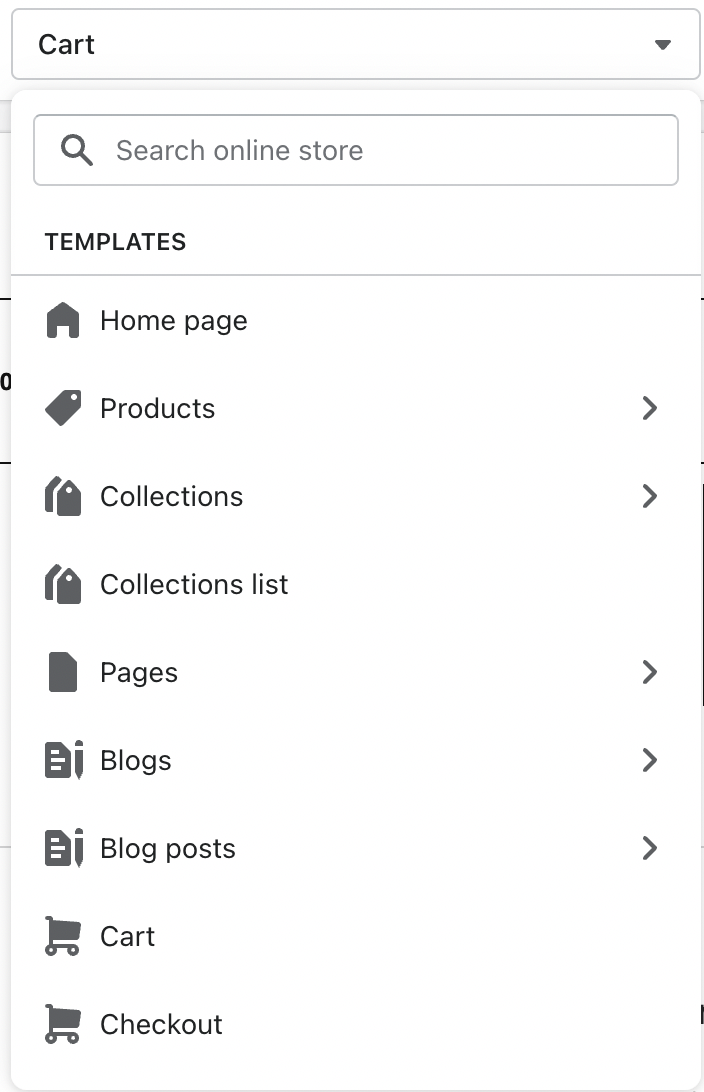
- You will arrive at the Themes page - from here, find the theme you wish to modify and select Customize:
- Note: You must be on a Shopify O2.0 Theme to use Theme sections. Otherwise, you may need to upgrade! It's easy!
- Note: You must be on a Shopify O2.0 Theme to use Theme sections. Otherwise, you may need to upgrade! It's easy!
- Now you are ready to customize your widgets! Check out the video below for an overview.

A Quick Glimpse at How to Customize Your Widgets
Step by Step
1. After following the above steps to get to Customize Theme, you'll find yourself in the theme editor. Toggle to "Products" or "Cart" or choose another template at the top in order to see a specific page.
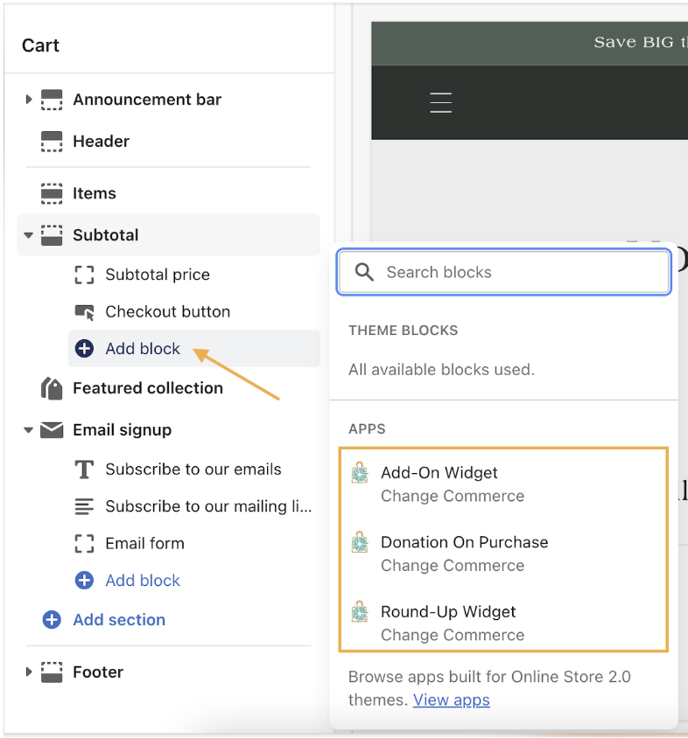
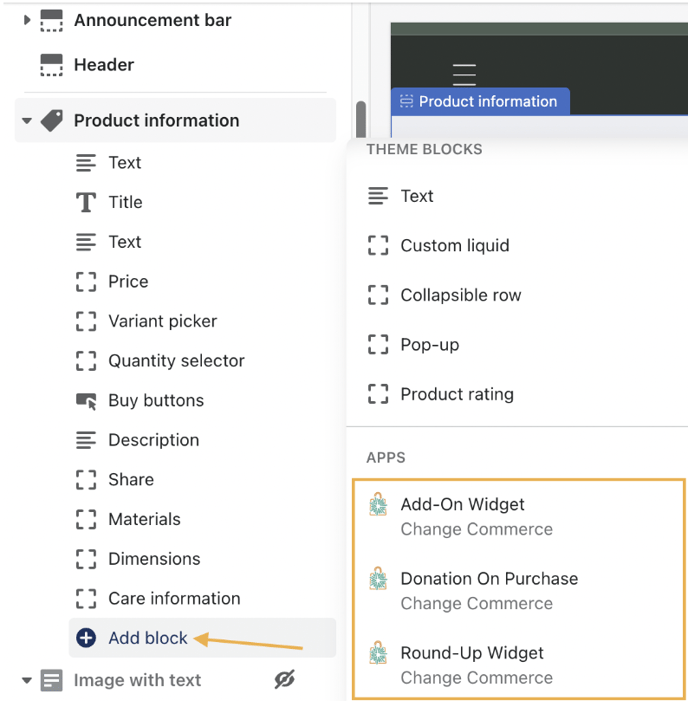
2. Click on Add Block and scroll or search under "apps" to find the Round-Up, Add-On, or Store Donation on Purchase widget
- For the "Cart" template, click Add Block within the Subtotal section to add any of your ShoppingGives widgets
- For the "Products" > "Default Product" template, click Add block within the Product information section to add any of your ShoppingGives widgets
3. Select any of your ShoppingGives widgets to further expand your customizable options! You'll be able to preview your options as you start to customize.
4. Don't forget to click "Save!"
What You'll Be Able to Customize
- Font picker
-
Title font color
-
Main text color
-
Link font color
-
Background color
-
Border color
-
Border radius
-
Button radius
-
Custom title
-
Checkbox color
-
Only applicable for the Customer Round-Up widget
-
- Button text
- Only applicable for the Add-On widget
Not able to access Theme Sections? See our quick-start checklist below!
✔️ Ensure you are using a Shopify 2.0 Theme!
✔️ Ensure your campaigns are "on!"
- Store Donation on Purchase
- To do this, select the Campaign drop-down button from the main menu > select Store Donation on Purchase > from the Campaign Settings tab, click Turn On from the Donation on Purchase Widget section > Save.
- Next, navigate to the Widget Settings tab of your Store Donation on Purchase campaign to select Theme Section for the widget placement
- To do this, select the Campaign drop-down button from the main menu > select Store Donation on Purchase > from the Campaign Settings tab, click Turn On from the Donation on Purchase Widget section > Save.
- Customer Round-Up
-
- To do this, select the Campaign drop-down button from the main menu > select Customer Round-Up > click Turn On from the Round-Up Widget section > Save.
- Next, navigate to the Widget Settings tab of your Customer Round-Up campaign to select Theme Section for the widget placement
- To do this, select the Campaign drop-down button from the main menu > select Customer Round-Up > click Turn On from the Round-Up Widget section > Save.
-
- Customer Add-On
- To do this, select the Campaign drop-down button from the main menu > select Customer Add-On > click Turn On from the Customer Giving section > Save
- Next, navigate to the Widget Settings tab of your Customer Add-On campaign to select Theme Section for the widget placement
- To do this, select the Campaign drop-down button from the main menu > select Customer Add-On > click Turn On from the Customer Giving section > Save
✔️ Ensure your store is set to "Active!"